

How To Round Image Corners In Photoshop Cs6
Make wireframes in Photoshop CS6
Apart from pencil and paper, there are many digital tools for creating wireframes—the "lo-fi" layout of a web folio that helps yous to determine its basic construction before adding in visual design. I benefit of using Photoshop CS6 equally your wireframing tool is that you lot may use the wireframe as a base for your detailed mockup, rather than having to start from scratch.
Solution
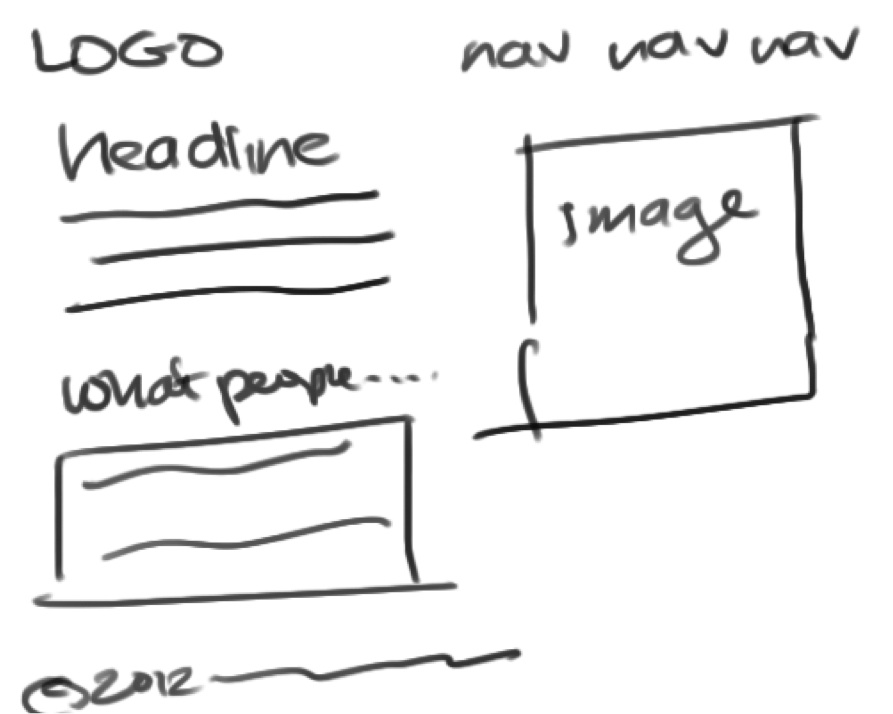
The below epitome reveals the "napkin sketch" that my fictitious client has provided me, which is one way of providing a wireframe.
After talking more with my client, I've gathered additional requirements for the abode folio:
- The client wants a "learn more" button after the headline and intro text.
- He will have no more two quotes in the "what people are proverb" area.
- The customer likes the idea of having a groundwork color or image with a boxed content surface area that is white.
Fourth dimension to fire up Photoshop and create a wireframe that takes bodily dimensions into account and provides a slightly more polished look.
Start by creating a certificate based on the 960 grid organization (which you can acquire about in the section chosen "Setting up a Filigree in Photoshop" plant in the complimentary sample capacity) that is i,100 pixels broad by 750 pixels high. If you want, apply the Paint Bucket Tool (G) and fill the groundwork with a low-cal grey colour to represent that there will be a groundwork colour or image.
Choose the Rectangle Tool (U) and describe a box to represent the content area. Since I'g using the 960 grid system, my box is 940-pixels wide. I've made the foreground colour white and then that it shows up confronting the gray background.
To make the process faster, type D to set the foreground to blackness and the background to white. We'll depict black boxes to correspond the content areas, then change the opacity to make them appear gray, as shown hither:

Following the grid, add a rectangle to represent the logo. Lower the opacity of the rectangle past immediately typing in an opacity value ("thirty") after you lot draw the rectangle. If you wish, add text using the Type Tool (T) to add the text "LOGO" over the box. Add another rectangle to represent the navigation surface area, and again, lower the opacity value to make it greyness.
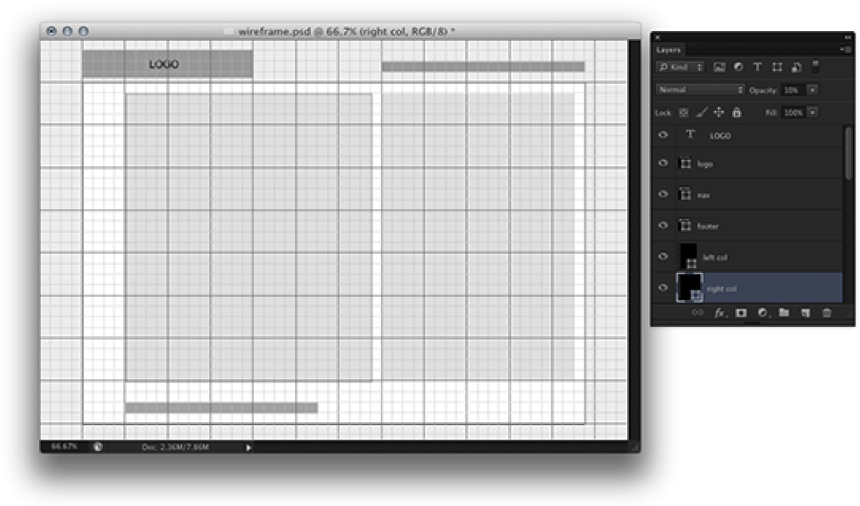
You may want to add together rectangles to help indicate the content column areas. The next image shows I've decided on a two-column layout with a slightly larger main content column and a smaller column for the home page epitome. I set the opacity to ten% for the columns, and besides added some other rectangle to correspond the footer at the lesser of the folio.
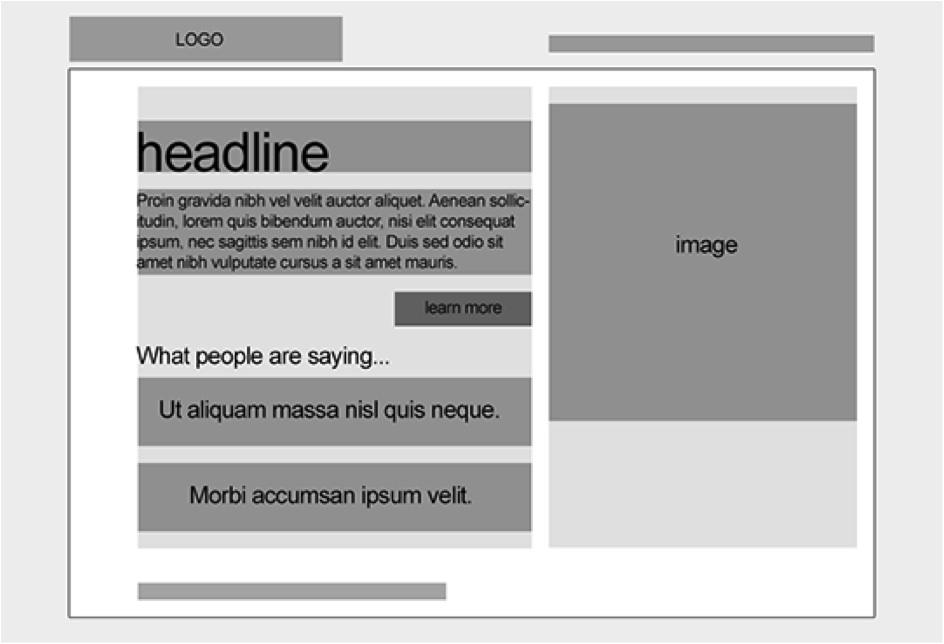
Draw rectangles to represent the content areas within the columns. You may also wish to add together dummy text using Photoshop'southward Type > Paste Lorem Ipsum control. My completed wireframe can be seen here:
Making a rough wireframe similar this gives the client a sense of where content goes on the page, only allows for quick and easy editing if you demand to move items around.
For more than how-to'south, examples and time-saving suggestions, cheque out the volume in more particular (or download a sample PDF of the volume).
Now check out this great selection of free Photoshop brushes (opens in new tab) at our sister site Creative Bloq (opens in new tab)

Thanks for reading 5 manufactures this month* Bring together now for unlimited access
Enjoy your offset month for just £one / $1 / €one
*Read 5 gratuitous manufactures per month without a subscription
Bring together now for unlimited access
Endeavour beginning calendar month for just £one / $i / €i
Related articles
Source: https://www.creativebloq.com/netmag/make-wireframes-photoshop-cs6-7126190
Posted by: gibbsclun1937.blogspot.com
0 Response to "How To Round Image Corners In Photoshop Cs6"
Post a Comment